

These are the best ready-made indoors dog kennels. Check them out on Amazon:
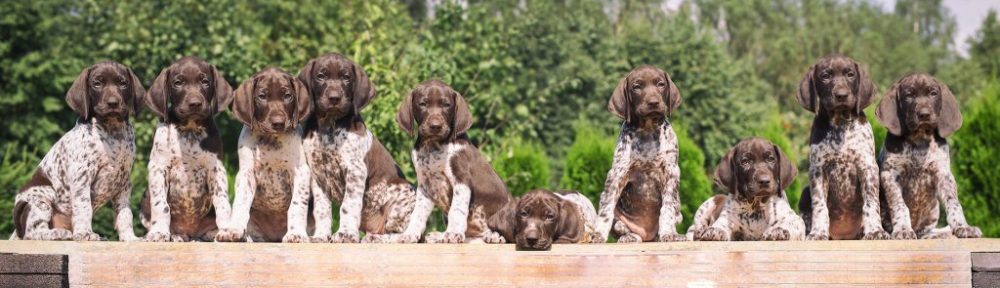
Today I will bust the myth that it’s impossible to bring up such active dogs as German Shorthaired Pointer in an apartment. I am actually practicing it this time and want to share this experience with you and give some valuable tips.
Let’s start from the beginning…
First three weeks puppies grow in a whelping box.

It is a specially designed box which has two key elements:
- Inner frame near the bottom of the box. This frame is vital – it protects puppies from being trapped by dam’s body when she lies down. The puppies can easily slip out and evade suffocation any time a mother presses them down with her body.
- The front barrier, which keeps the puppies inside and gives the possibility for mother to get in and out anytime.
Whelping box is only good for the first three weeks, then the pups need a bigger space which consists of sleeping zone, potty station and, of course, a play area.
We have made our whelping box ourselves, but you can buy it online. Here is a great option: Plaza MagnaBox Whelping Box (Large) .
At three weeks the pups become more mobile. Puppies have been removed from the whelping box and placed into 8.5 sq. m (91.5 sq. ft.) indoor kennel.
An indoor dog kennel helps to keep puppies safe and teach them to distinguish sleeping area from potty station.
The papered area (potty station) should be twice the size of their sleeping zone. At this time I try to keep the sleeping zone as clean as possible and only change the paper outside. They learn to go outside to eliminate very quickly, as by day 21 they have developed their sense of smell and will start to discriminate where to relieve themselves. They can now eliminate without dam’s stimulation.
Now let’s get to the most interesting part – how to build the indoor kennel.
STEP 1: Choose a place
It is very important to choose the right place for indoor kennel.
The place should meet these criteria:
- The area should be spacious enough. I would recommend to dedicate at least 1 sq. m (11 sq. ft.) per pup but not less than 5 sq. m (55 sq. ft.) per whole kennel.
- The window is necessary. The bigger the better. Natural daylight causes proper development of skeleton.
- I would recommend to make a kennel in the living area. Let me tell you why. Our last litter was brought up in a separate room. The puppies were more sensitive, because they did not see us (people) and their mother all the time. Now we see them all the time we are at home. They are significantly calmer, they get more attention and socialize more.
- The place should be warm and draft-free. The optimal temperature is 20-24 °C (68-75 °F).
STEP 2: Protect the floor
You want to keep your floor and walls nice and clean after the puppies are gone. So you need to make sure you have protected them well before installing the kennel. Here are my suggestions how to protect the floor and walls:
- Clear the space were the kennel is planned. It should not contain any items such as furniture or other household things. Otherwise the puppies will try to taste everything what is in.

- Protect the floor from moisture. I would recommend using a semi thick plastic film.

- If there is a need for protection against the sound, second layer can be an old carpet. Carpet not only absorbs the sound but takes the moisture in.

- The third layer is an irreplaceable linoleum. The best is to choose linoleum with a surface texture – it is less slippery.

STEP 3: Protect the walls
- All walls which are in the pen should be covered by wooden or plastic boards.
- Boards must be firmly installed because puppies will jump on and scratch them.
- For the outer wall the best is to use special pen fence with a door in it. Myself I use the outdoor fence but indoor fence suits this purpose perfectly as well. I recommend using Midwest Gold-Zinc Indoor/Outdoor Exercise Pet Pen .

- Fence fortifications or frame must be installed, because puppies will try to get through the fence every time they get up or see the mother.

Other important points:
- If you have neighbors behind the thin wall, I would suggest taking care of soundproofing your walls.
- The kennel must be made in the place with a window. It is necessary for puppies to get a day light every day for proper development. Even the flower wouldn’t grow without a day light.
- Papered area (potty station) should be made right from the first day puppies are moved into kennel.
- It is very practical to attach a pail for drinking water to the fence, so that puppies can not spill it out. I recommend to use specially designed flat sided pail. They come in different sizes. I use 1 liter (1 Quart) pail.
As you can see from the picture, I use carbiner to attach it to the fence.

- On the third day since puppies are in the pen and they get more connected to environment, I give them first toys.
- For the sleeping zone I use dog crate to divide it from play area and most important – potty station. It helps to keep sleeping zone clean. The other advantage of using dog crate is that puppies recognize it as a safe and comfortable zone from early days, so it is way easier for a new owner to attune a pup to its own crate.
I use Midwest Life Stages Double-Door Folding Metal Dog Crate because it offers great value with both the divider panel and plastic pan included. These crates fold easily without tools, include carrying handles and are ideal for the pet owner who wants a dog crate that is quick and easy to fold and carry, yet sturdy enough to contain an active pet.
It is recommended that you buy the crate for the adult size of your dog. The divider panel (included for free) allows you to adjust the size of the living area, so your crate adapts to the size of your dog as it grows. And I like it in black color.")
This is my way of installing an indoor kennel. I believe these tips will be useful to you. If you have some ideas to share or offer your own suggestions, please comment bellow.
Stay tuned for the next post coming soon!
Some links on my blog are affiliate links, which means that I receive a commission if you chose to purchase the product at that link. You DO NOT overpay for the item if you buy it through my affiliate link – the seller only pays me a commission. I am very careful about what I recommend. All products are ones I or people I trust have tried and highly recommend.Some links on my blog are affiliate links, which means that I receive a commission if you chose to purchase the product at that link. You DO NOT overpay for the item if you buy it through my affiliate link – the seller only pays me a commission. I am very careful about what I recommend. All products are ones I or people I trust have tried and highly recommend.Some links on my blog are affiliate links, which means that I receive a commission if you chose to purchase the product at that link. You DO NOT overpay for the item if you buy it through my affiliate link – the seller only pays me a commission. I am very careful about what I recommend. All products are ones I or people I trust have tried and highly recommend.Some links on my blog are affiliate links, which means that I receive a commission if you chose to purchase the product at that link. You DO NOT overpay for the item if you buy it through my affiliate link – the seller only pays me a commission. I am very careful about what I recommend. All products are ones I or people I trust have tried and highly recommend.
")
Ačiū labai už straipsniuką, tikrai labai aktuali, naudinga ir išsami informacija!
Really Great Job!
Really!
Inga, Y, Olya, thank You!
The lesson, that everything is possible if you want. Well done!
Rasa, indeed it is!
Thanks a lot!
Hi, great post, I intend building something similar but how does one get in and out of the pen?
Thank You, Ogba.
There is a gate with lock in the fence
Yea. I noticed it in the photographs. Just couldn’t tell if it was large enough for people to fit through. Thanks.
Hi great post! Thank you i have 2 questions.. the reinforcement what are u attaching the sides to? And the sleeping area is open is that the potty pad area right outside of it? Is that the best place to put it?? Do i put them there in potty area will they naturally go there or will the dam teach them/place them there herself? Thank you
Hi, Natalie,
thank for your the message. Sorry for late respond.
I was on my Holiday away from the country.
The side protection boards are connected with the front fence and it makes the frame of 3 long strong “walls”, so I protected my flats walls as there was no need to make any direct reinforcement to the wall.
Yes, in front it is the potty area for the first 1-2 weeks as I replace them from whelping box to this place at the age of 3 weeks. In 1-2 weeks I replace the potty are to the right side (or the other side from the sleeping zone), so that puppies would walk not directly from the sleeping area to potty area.
If I would place the potty area father out in a very beginning, the puppies wouldn’t walk as they are too small at the beginning.
The Dam won’t teach them this specific action, they’ll do it naturally .
Hope it was helpful,
All the best,
Migle
Useful piece ! I was enlightened by the specifics , Does someone know where my business would be able to get ahold of a template URL – IRS 1099-MISC form to fill in ?
My colleagues required CA DMV INF 1105 earlier today and were made aware of a great service that hosts a ton of fillable forms . If you need to fill out CA DMV INF 1105 too , here’s
https://goo.gl/dDZYC8We have just had a litter of 7 German Shepards. They are 8 days old and I am trying to find the best material to use for the pen. I am new at raising these pups, the Sire is cleaning the pups like the Dame is, I am trying to find a way to keep him away so he doesn’t hurt the pups? Any suggestions when I place them in the pen after 3 weeks?